15 Nisan 2010 Perşembe

KAPI ALARMI

This is a simple - easy to build - alarm circuit. For power - I used a small 9-volt battery. But the circuit itself will work from 5 to 15-volts - just choose a buzzer that's suitable for the voltage you're using. The standby current is virtually zero - so the battery life is good.
                                         A Photograph Of The Prototype. 


A Photograph Of Ron J's Cmos 4001 
Based Door Alarm - Circuit Board
Simple Door or Shed Alarm - 
Schematic Diagram
MALZEMELER ŞEMALARIN ÜZERİNDE 
VERİLMİŞTİR


If SW1 is fitted to a door - every time the door opens - the Buzzer will give a short beep. In an unattended shop - or reception area - the sound of the beep will alert you to the fact that you have a customer. How long the output lasts depends on the values of R2 and C2. With the values shown - it will last for somewhere between 3 and 5 seconds.

But - by increasing these values - you can achieve an output time of up to half-an-hour or more. So if you replace the Buzzer with a relay - and use the relay to switch a Siren - you have a Simple Intruder Alarm that you can fit almost anywhere.

I've drawn SW1 as a magnetic-reed switch - but you can use any type of switch that suits your application. If you have more than one door or window to protect - you can use more than one switch. Just wire all of your switches in series.

Changing the Output Time
Generally speaking - the length of the output time is proportional to the values of R2 and C2. In other words, if you double the value of either R2 or C2 - you will double the output time. If you halve the value of either R2 or C2 - you will halve the output time.

For example, if you replace R2 with a 4M7 resistor you will increase the output time by a factor of about 5. If you replace C2 with a 470uF capacitor you will increase the output time by a factor of about 100. If you use both a 4M7 resistor and a 470uF capacitor together, you will increase the time by a factor of about 5 X 100 = 500. This should give you an output of around half-an-hour or more.

If you want an accurate output time - use a variable-resistor (or preset) in place of R2. Then simply adjust the resistor until you get the output time you require.


Simple Door or Shed Alarm - 
Schematic Diagram


Veroboard Layout


The Support Material for this circuit includes a parts list - a detailed circuit description - a step-by-step guide to construction and details of How To Test Your Finished Alarm


A Photograph Of Ron J's Cmos 4001 
Based Door Alarm - Circuit BoardPhotograph Of The Prototype.


.

If you're new to using Cmos ICs - and you'd like to know more about how they work - take a look at my introduction to The Cmos 4001. It makes use of the present Door Alarm Circuit to explain - in detail - just how the IC operates. 


Hiç yorum yok:

Yorum Gönder

İzleyiciler

LED DİRENÇ HESAPLAMA

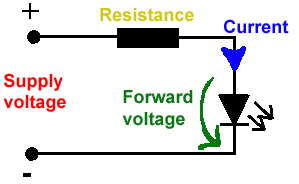
All LEDs require current limiting, without a current limiting mechanism the LED will usually burn out in under a second. Adding a simple resistor is the easiest way to limit the current. Use the calculator below to find out the value of resistor you require.

For example if you are wanting to power one of our_blank">red LEDs in an automotive application you would see that the typical forward voltage is 2.0 Volts and the maximum continuous forward current is 30mA. Therefore you would enter 14.5, 2.0 and 30 into the Single LED calculation box. After calculating you get 470ohm 1 watt as the result. Here is a that allows you to enter a resistor value and generate the corresponding color code.

Note: For automotive applications use the actual system voltage, not 12 Volts. Most 12 Volt system actually operate at around 14.5 Volts.

Supply Voltage
VOLTS
Voltage Drop Across LED
VOLTS
Desired LED Current
MILLIAMPS


Calculated Limiting Resistor
OHMS
Nearest higher rated 10% resistor

Calculated Resistor Wattage
WATTS
Safe pick is a resistor with
power rating of (common values are .25W, .5W, and 1W)
WATTS

LEDs in series

Several leds in series with one resistor
Supply Voltage
VOLTS
Voltage Drop Across LED
VOLTS
Desired LED Current
MILLIAMPS
How many LEDs connected


Calculated Limiting Resistor
OHMS
Nearest higher rated 10% resistor

Calculated Resistor Wattage
WATTS
Safe pick is a resistor with
power rating of (common values are .25W, .5W, and 1W)
WATTS
LM317 UYGULAMA DEVRELERİ HESAPLAMASI


Çıkış Voltajı
R1 resistor

R2 resistor

R1 resistor
R2 resistor

Çıkış Voltajı


Lm317 uygulama devreleri ve detayli bilgiye Buradan ulasabilirsiniz

LM555 - ASTABLE OSCILLATOR CALCULATOR

LM555 - ASTABLE OSCILLATOR CALCULATOR
Value Of R1 Ohms Value Of R2 Ohms
Value Of C1 Microfarads
Output Time HIGH SECONDS Output Time LOW SECONDS Output Period HIGH + LOW SECONDS Output Frequency HERTZ Output Duty Cycle PERCENT
Resistor values are in Ohms (1K = 1000) - Capacitor values are in Microfarads (1uF = 1)

NOTE: The leakage currents of electrolytic capacitors will affect the actual output results of the timers. To compensate for leakage it is often better to use a higher value capacitor and lower value resistances in the timer circuits.

LM555 Astable Oscillator Circuit Diagram


LM555 - ASTABLE CAPACITOR CALCULATOR

The next calculator can find the capacitance needed for a particular output frequency if the values of R1 and R2 are known.

Value Of R1 Ohms Value Of R2 Ohms
Frequency Desired Hertz
Capacitance uF
s

VOLT AMPER OHM ve WATT HESAPLAMA

Current:
kA (kiloamps) A (amps) mA (milliamps) µA (microamps)
Voltage:
kV (kilovolts) V (volts) mV (millivolts) µV (microvolts)